

Before you start creating content, it helps to understand how ClickLearn Attain organizes your project. Two main features shape how your users experience the content: Structure and Segmentation.
Think of structure as the way you organize your lessons, and segmentation as the way you decide who sees what. When these two work together, your learning portal becomes cleaner, smarter, and easier to use.
In this guide, you’ll set up your own project from scratch, add recordings and assets, and finally customize it for different learners using segmentation.
What is Structure & Segmentation?
Before you start building, it’s important to understand what structure and segmentation mean in ClickLearn and how they complement each other.
Structure
Definition:
Structure is the process of organizing your project’s content into clearly defined sections and headings. This helps create a logical and easy-to-navigate document for your end-users.
Purpose:
Organizing your content with structure makes your documentation or training material easier for readers to browse and understand. A well-structured document allows users to quickly find the information they need.
How it works:
You can start by adding sections such as "Introduction" to your project. Under each section, you can include text blocks, images, or other types of content as needed. Use different levels of headings to further organize subsections within each main section.
Example:
An organized project might have main sections for "Installation," "Basic Usage," and "Advanced Features." Each section contains relevant details and instructions, making the document easy for users to follow.
Segmentation
Definition:
Segmentation lets you create multiple, distinct versions of your published content; each tailored for a specific audience. This means you can provide customized content to different user groups without creating separate projects.
Purpose:
Segmenting your content helps control which information each audience can see. This is especially useful for projects where different teams or departments only need to access the information relevant to them, all within one project.
How it works:
Using the Structure Editor, you first define a general structure for your project. Then, you can select which sections and content blocks to include in each segment. After configuring segments, each one generates its own unique hyperlink, which you can distribute to the appropriate audience.
Example:
Suppose your project is used by both the Finance and Management teams. You can create a "Finance" segment that shows only finance-related content, and a "Management" segment for management-specific information—while still maintaining a single master project structure.
Basic Components of Structure & Segmentations
Now that you know what structure and segmentation are, let’s look at the key components you’ll use to organize your project effectively.
The basic components for structure and segmentation in ClickLearn are sections, headings, text, hyperlinks, and dividers, used within the structure editor to organize content.
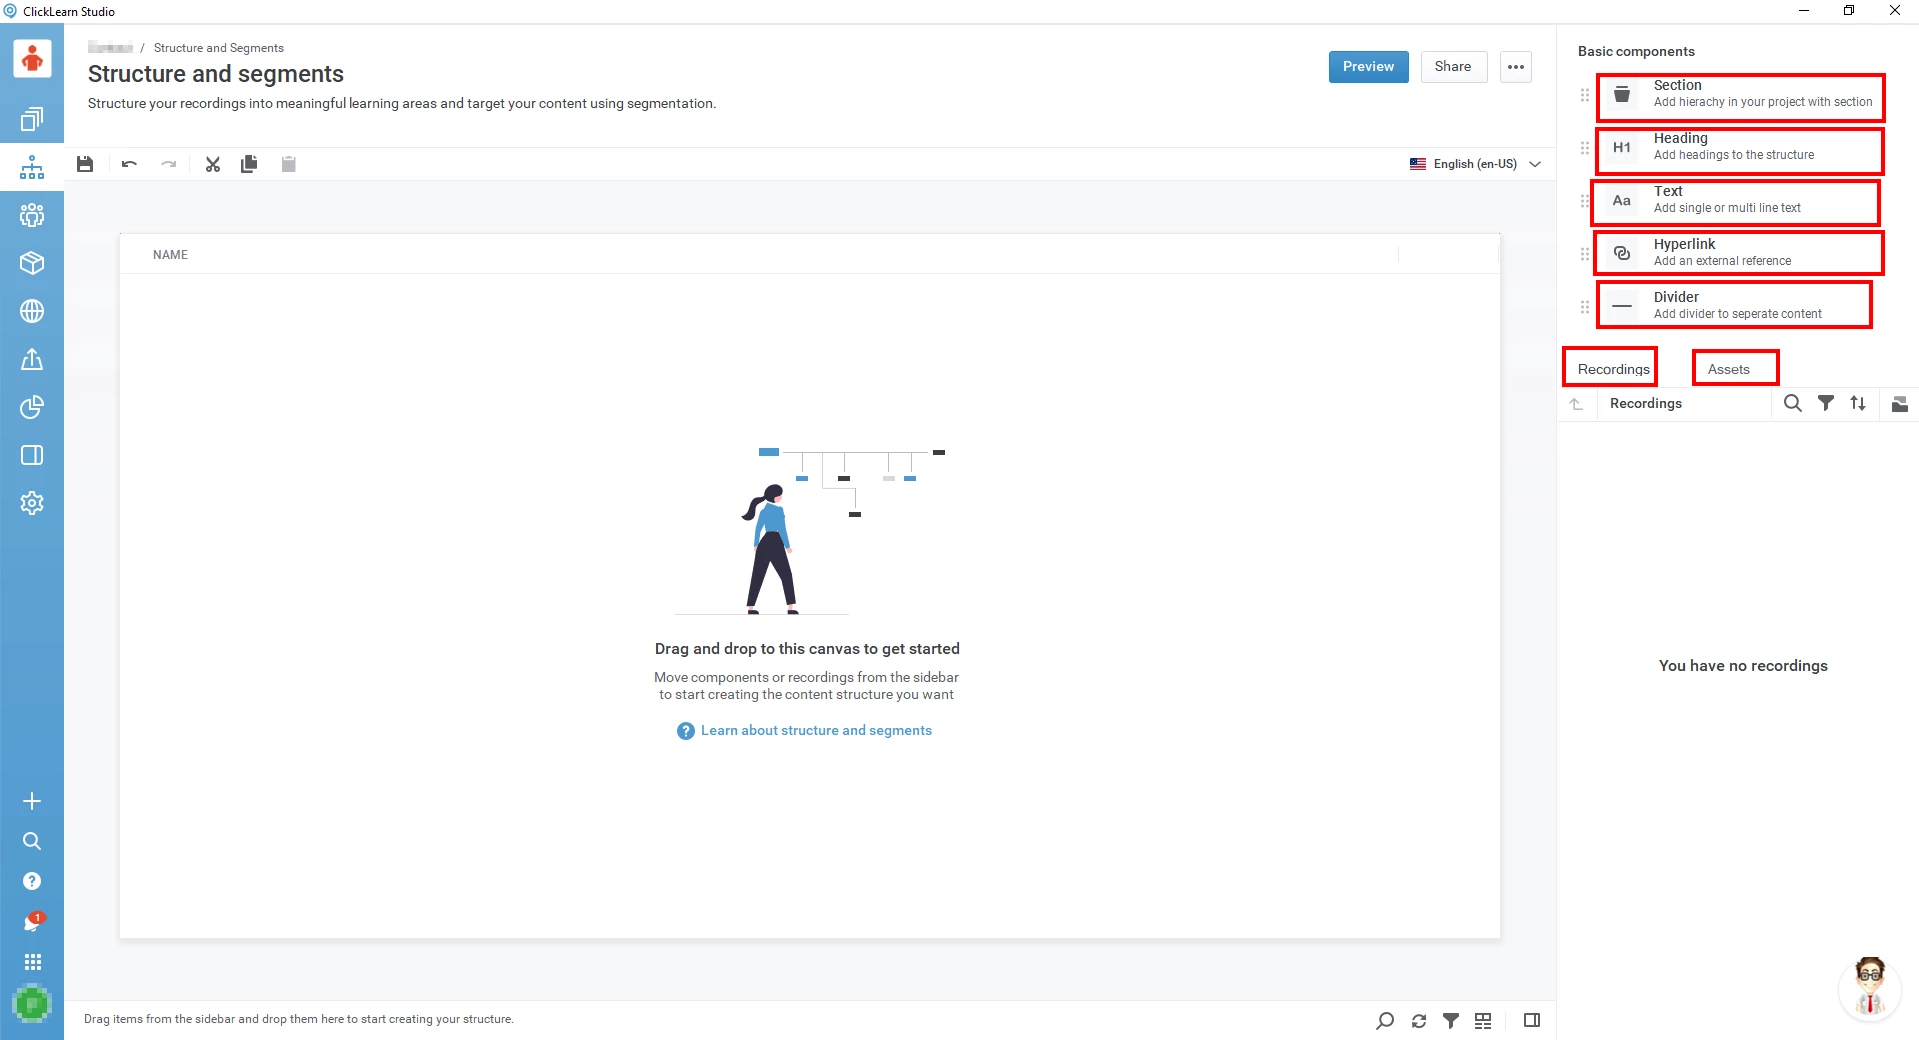
Section
Use a Section to group related learning materials. Drag it from the right-side pane and drop it in the center area to organize your content into clear parts.
-
Title: Rename the section based on your needs.
-
Icon: Choose how to set an icon for your learning portal.
- Auto: ClickLearn assigns an icon automatically based on the title and content.
- Gallery: Select an icon from the available options.
- Upload: Upload your own icon by dragging and dropping or browsing your computer.
-
Color: Choose a color for the icon.
-
Languages: Select which languages the element should be available in.
-
Publishing Template: Adjust how your portal looks using templates.
- Project (default): The standard template for your project.
- Create a new template: Build a new one if you want to customize your layout. (Example: HR template.)
-
Segmentation: Decide which segments should include this section. Each segment creates its own deployment URL.
- Create a new segment: Enter a name and save it. (Example: Finance segment.)
-
Language-independent URL part (LIUP): Add a LIUP name to access the section through a specific URL.
Note: If two sections don’t have LIUP names and one is nested inside another, ClickLearn will automatically generate LIUP names for both.
Heading
Use a Heading to introduce main topics or subtopics in your content. You can change the title, size, and style to make it stand out.
Text
Add single or multi-line Text to explain steps or details.
-
You can enter up to 300 characters.
-
To format the text, click the expand button next to the Text field.
Hyperlink
Add a Hyperlink to connect learners to external web pages or materials.
-
Text to display: Enter the text you want to show for the link (at least 50 characters).
-
Hyperlink address: Add the web address or resource you want to link to.
-
Open hyperlink in: Choose how the link should open:
- In a new tab
- In a new window
- Embedded in the learning portal
Divider
Use a Divider to create a horizontal line that separates different sections or elements in your portal. This helps keep your structure clean and visually clear.
Choose from three types of dividers:
-
Solid: Displays a solid line.
-
Dashed: Displays a dashed line.
-
Dotted: Displays a dotted line.
How to add Recording or Assets to a Structure?
Once your structure is ready, it’s time to fill it with actual content like recordings and assets. Here’s how to do it.
To add recordings or assets to a structure in ClickLearn, use the drag-and-drop method. You can drag a recording from the right-side panel or an asset from the assets page and drop it directly into the desired location within the structure list.
-
Locate the recording or asset: Find the recording you want to add in the recordings list or the asset you want to add on the assets page.
-
Click and drag: Click and hold the left mouse button on the item you want to move.
-
Drag to the structure: Move your cursor to the structure list and drag the item to the specific section or root where you want to place it.
-
Release the mouse button: Release the left mouse button to drop the recording or asset into its new location.
Other Useful Features
ClickLearn provides extra tools to help you manage content efficiently. Here are a few you’ll use often.
-
Search: Use this to quickly find specific recordings or assets from their respective tabs.
-
Filter: Choose a column and type from the list to narrow your results. This helps you locate recordings or assets in complex lists based on your criteria.
-
Sort: Arrange recordings and assets in the order that best fits your project workflow.
-
Explorer: View and manage the folders belonging to your current project. You can also include additional files or recordings directly from here.
Using the Tool Strip Buttons
The Tool Strip is located at the top of the structure screen and houses important functions, such as saving, editing, and managing content.
Explanation of Each Tool Button and Its Functionality
-
Save: Save your progress.
-
Undo/Redo: Quickly revert changes or restore them.
-
Cut/Copy/Paste: Manage the movement of components within your structure.
-
Preview: View a live version of your structure.
Previewing, Sharing, and Other Options
How to Preview Your Structure and Segments
Use the Preview feature to check how your portal will look and behave once live. This is a great way to ensure everything is in order.
Sharing Your Structure with Others
After previewing, use the Share button to send your structure to collaborators or stakeholders for feedback.
Additional Options for Customization and Management
ClickLearn Attain provides several additional options, such as:
-
Import/Export: Import existing structures or export your current structure for backup.
How to Import an Existing Structure into Your Project
You can easily reuse or share your work by importing or exporting structures and segments between projects or Excel.
-
To import a structure from another project:
-
Click the Structure button.
-
Select the Structure More icon.
-
Choose Import Structure from the menu.
-
In the pop-up window Import Structure from Other Project, pick the project you want to import the structure from.
-
Once selected, the structure from that project will appear in your current project.
How to Import Segmentation from Excel
-
To import segmentation from Excel:
-
Export your existing segmentation first (if you need a base file).
-
Make changes in Excel, add, edit, or delete segments as needed.
-
Save the updated Excel file.
-
In ClickLearn, open your project and click Structure.
-
Go to Structure More and select Import Segmentation from Excel.
-
Choose your file and click Open (or press Alt+O).
-
Once imported, you’ll see a confirmation message. You can then assign segments to your recordings under the Advanced tab.
How to Export Segmentation from Excel
-
To export segmentation to Excel:
-
Click Structure.
-
Open Structure More and select Export Segmentation to Excel.
-
Choose where to save the file and click Save (or press Alt+S).
-
You’ll see a notification confirming the export. You can then open the Excel file to view and edit segments.
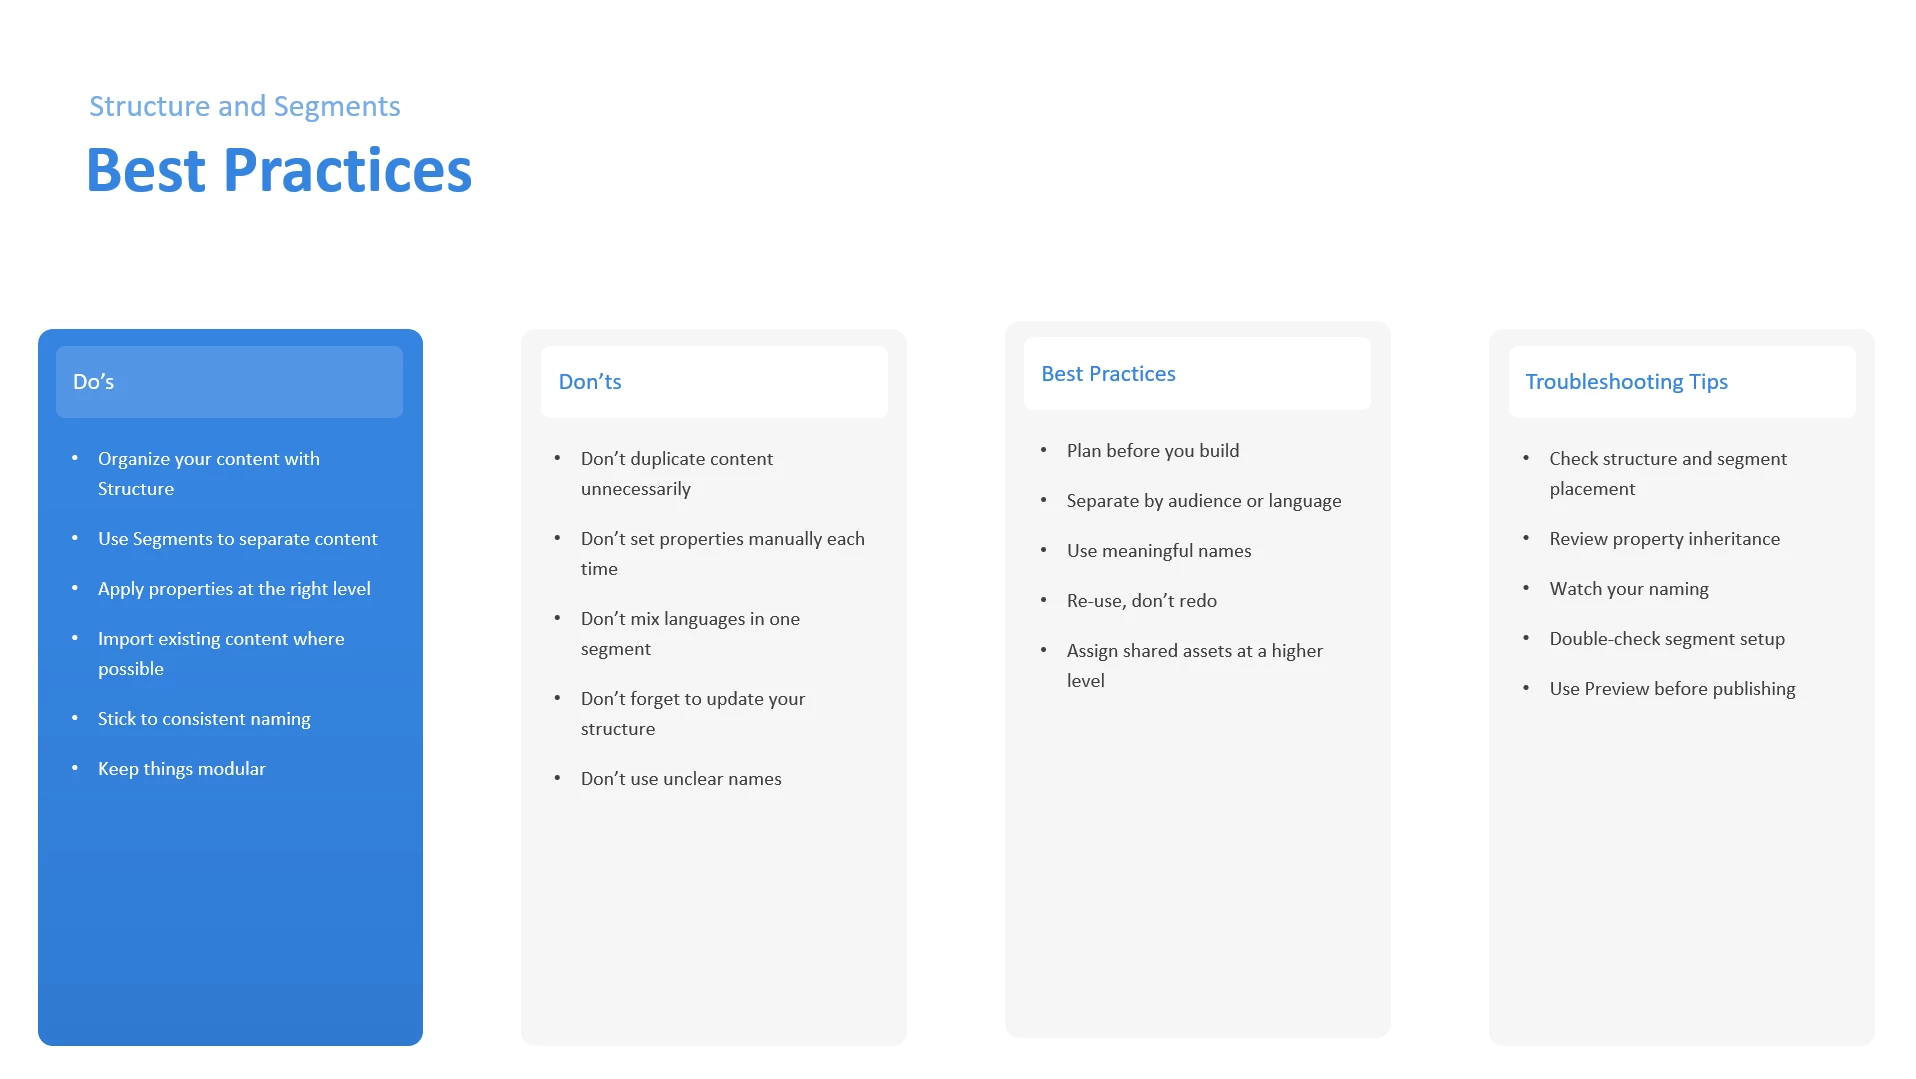
Best Practices and Expert Tips for Organizing Content with Structure and Segments
Here are the top best practices and actionable tips to help you get the most out of Structures and Segments, whether you’re just getting started or refining your workflow.
1. Start With a Clear Plan
Before you build anything, map out your content’s structure and define your segments based on your audience, or departmental needs. Planning ahead saves you time, reduces errors, and simplifies updates in the future.
2. Organize Content with Logical Folder Structures
Create folders and subfolders in a way that mirrors how your project functions. Group similar modules together and always use clear, descriptive names that make sense to anyone on your team.
3. Segment Content for Each Audience
Set up dedicated segments for different user types (like learners, admins, or partners) or languages. This ensures that users only access content relevant to them, making localization and permissions easier to manage.
4. Apply Properties at the Structure Level
Instead of editing each piece of content individually, assign properties like branding, logos, or legal disclaimers at the top level of your structure. This cascades settings to all contained assets, ensuring uniformity across your content.
5. Maintain Consistent Naming Conventions
Avoid generic labels like “Folder1” or “New Segment.” Use meaningful, standardized names (e.g., “EN_Sales_Team” or “FR_CustomerSupport”) to aid in searchability and reduce confusion as your portal expands.
Conclusion
Structure and Segmentation are the backbone of how you organize and personalize content in ClickLearn Attain. Once you get the hang of them, managing your projects becomes much smoother.
Together, they help you deliver clear, relevant, and professional learning portals without extra effort. As you explore and build more projects, you’ll find your workflow getting faster and your content more consistent every time.